Application Note EDXRF1812
Scope
This application note demonstrates the measurement of phosphorus (P) conversion coating on galvanized steel using NEX QC+.
Background
Aluminum and steel are often coated with a protective conversion coating, also called passivate or passivation coating, to prevent oxidation and corrosion of the base metal. Conversion coatings include chromium (Cr), titanium (Ti), vanadium (V), manganese (Mn), nickel (Ni), phosphorus (P), or zirconium (Zr). A phosphate coating may be applied to minimize wear on cutting tools and stamping machines.
Aluminum is often coated for use in aircraft parts, aluminum window frames, and
other similar industries where the aluminum is exposed to weathering. Steel for
the automotive industry is typically first galvanized with a zinc coating before the
conversion coating is applied. Protected steel is also used for outdoor sheds and other similar uses where steel is exposed to weathering. Conversion coating also
helps in the retention of paint for the final finished product.
Calibration – standard range in air
An empirical calibration was built using a set of standards assayed by careful weigh-strip-weigh. The bare, galvanized steel sample with no P coating was measured to generate a special background correction that automatically compensates for the specific amount of background in each sample measured.
| Element: P Units: mg/m² |
||
| Sample I.D. | Standard value | Calculated value |
| 18 | 18.61 | 18.154 |
| 40 | 40.55 | 40.005 |
| 54 | 54.15 | 55.224 |
| 71 | 71.07 | 71.618 |
| 87 | 87.19 | 87.550 |
| 125 | 125.70 | 124.447 |
| 150 | 150.20 | 150.219 |
| 208 | 208.80 | 209.054 |
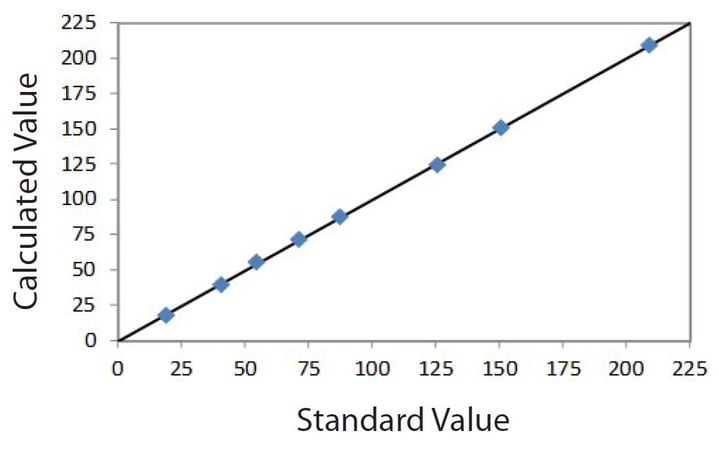
Correlation plot P on steel
Recovery and repeatability
To demonstrate repeatability (precision), the low- and high-calibration standards were chosen. Each sample was measured in a static position for ten repeat analyses with typical results shown below.
| Element: P Units: mg/m² |
||||
| Sample I.D. | Standard value | Average value | Std. dev | % Relative |
| 18 | 18.61 | 18.840 | 0.166 | 0.9 |
| 208 | 208.80 | 208.545 | 0.518 | 0.2 |
Calibration – low range in air
An empirical calibration was built using a set of standards assayed by careful weigh-strip-weigh. The bare, galvanized steel sample with no P coating was measured to generate a special background correction that automatically compensates for the specific amount of background in each sample measured.
| Element: P Units: mg/m² |
||
| Sample I.D. | Standard value | Calculated value |
| 2 | 2.39 | 2.314 |
| 4 | 4.79 | 4.674 |
| 6 | 6.37 | 6.444 |
| 8 | 8.58 | 8.698 |
| 11 | 11.17 | 11.299 |
| 14 | 14.82 | 14.770 |
| 19 | 19.17 | 19.092 |
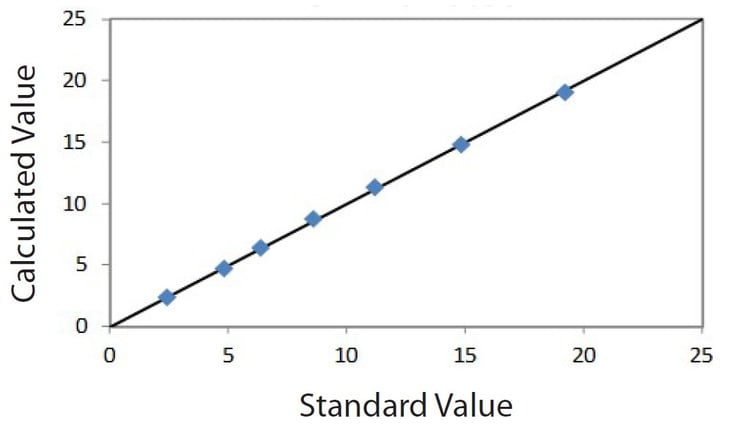 Correlation plot low P on steel
Recovery and repeatability
To demonstrate repeatability (precision), the low- and high-calibration standards were chosen. Each sample was measured in a static position for ten repeat analyses with typical results shown below.
| Element: P Units: mg/m² |
||||
| Sample I.D. | Standard value | Average value | Std. dev | % Relative |
| 2 | 2.39 | 2.329 | 0.026 | 1.1 |
| 19 | 19.17 | 19.119 | 0.042 | 0.2 |
Calibration – low range in helium
An empirical calibration was built using a set of standards assayed by careful weigh-strip-weigh. The bare, galvanized steel sample with no P coating was measured to generate a special background correction that automatically compensates for the specific amount of background in each sample measured.
| Element: P Units: mg/m² |
||
| Sample I.D. | Standard value | Calculated value |
| 2 | 2.39 | 2.304 |
| 4 | 4.79 | 4.738 |
| 6 | 6.37 | 6.426 |
| 8 | 8.58 | 8.692 |
| 11 | 11.17 | 11.263 |
| 14 | 14.82 | 14.722 |
| 19 | 19.17 | 19.143 |
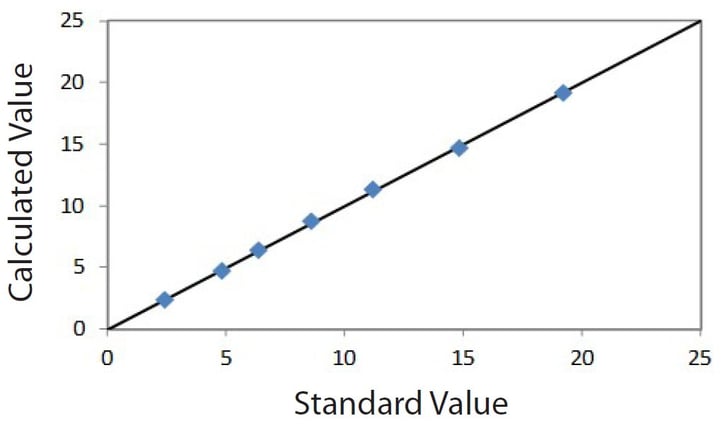 Correlation plot ultralow P on steel
Recovery and repeatability
To demonstrate repeatability (precision), the low- and high-calibration standards were chosen. Each sample was measured in a static position for ten repeat analyses with typical results shown below.
| Element: P Units: mg/m² |
||||
| Sample I.D. | Standard value | Average value | Std. dev | % Relative |
| 2 | 2.39 | 2.386 | 0.013 | 0.5 |
| 19 | 19.17 | 19.150 | 0.031 | 0.2 |
Sample surface and positioning
Aluminum may be surfaced with different patterns to give products various esthetic looks or physical properties. Such surfacing techniques may leave the aluminum smooth, may be brushed aluminum with a directional grain pattern, or may be a hatched or another pattern. The samples demonstrated here had a brushed directional grain pattern.
Conclusion
The performance shown here demonstrates NEX QC+ provides excellent sensitivity and performance for the measurement of phosphorus conversion coatings on galvanized steel.

