Application Note WDXRF1017
Introduction
Cast iron is important engineering material such as for machines and automotive industry parts. Cast iron is often manufactured in electric induction furnaces. There are various types of cast irons such as grey cast iron, ductile cast iron and Ni-resist cast iron. Specific property of each cast iron is controlled by the concentrations of alloying elements. Therefore, the rapid elemental analysis of the alloying elements including carbon and silicon for controlling composition of molten metal in furnaces is crucial for the quality control in the cast iron production. Sand casting molds are mostly used for casting cast iron. The elemental analysis of casting sands such as silica sand and olivine sand is also required to check the quality of recycled casting sands.
The X-ray fluorescence spectrometer ZSX Primus III+ can cover all necessary elemental analyses from carbon for various kinds of cast iron and casting sand. This note describes the application of cast iron analysis including ductile cast iron.
Instrument
The ZSX Primus III+ has tube above optics, where the X-ray tube is placed above the sample, Tube above optics reduces the risk of instrument contamination or damage that can occur when pressed pellet breaks inside the spectrometer while being measured or transported to the measurement position. The ZSX Primus III+ is ideal for the steel industry where both bulk metal and powder samples are analyzed as part of the process protocol during the manufacture of iron steel. The system software is based on Rigaku’s Flowbar interface that leads the user through a series of step by step procedures to optimize and execute measurements. “EZ analysis”, another Rigaku software innovation greatly simplifies the analysis setup and sample measurement. In addition, the software has various kinds of statistical process control functions ideal for the steel industry.
Standard and sample preparation
The certified standard reference materials of cast iron provided by TOYO-KOGYO were used to establish the calibration. The samples were polished using a grinding stone machine with 46-grit corundum abrasive stone.
Measurement and calibration method
Measurements were performed using the ZSX Primus III+ with a 3 kWatt Rh target X-ray tube. The Kα line was measured for all the elements at a counting time of 40 seconds for carbon and magnesium, the other elements was measured for 20 seconds.
A LiF(200) analyzing crystal and scintillation counter were used for all the heavy elements from Cr to Mo.
A PET crystal was used for Si and an optional Ge crystal was used to provide high resolution for the measurement of P and S.
RX61 and RX25 synthetic multilayers were used for C and Mg respectively.
The gas flow proportional counter was used for all the light elements.
The calibration curves obtained are shown in Figure 1 through Figure 10.
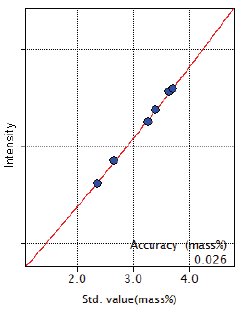 Figure 1: Calibration curve of C
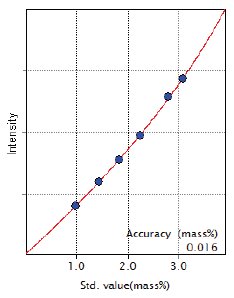
Figure 2: Calibration curve of Si
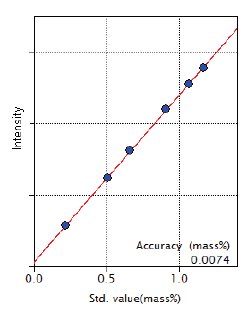
Figure 3: Calibration curve of Mn
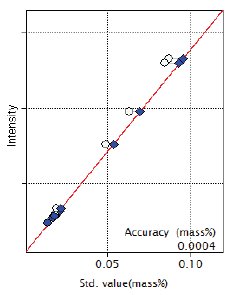
Figure 4: Calibration curve of P
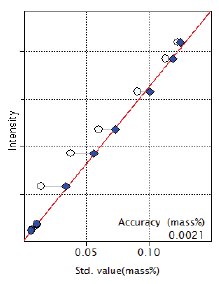
Figure 5: Calibration curve of S
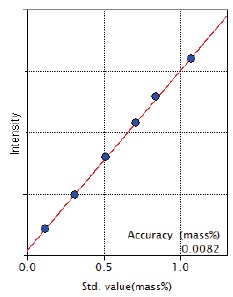
Figure 6: Calibration curve of Cu
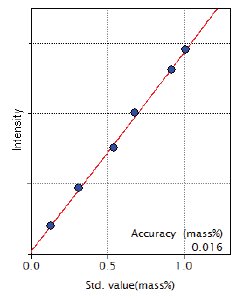
Figure 7: Calibration curve of Cr
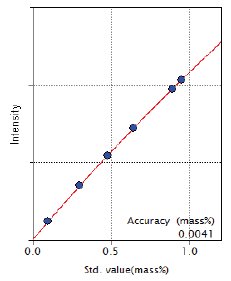
Figure 8: Calibration curve of Mo
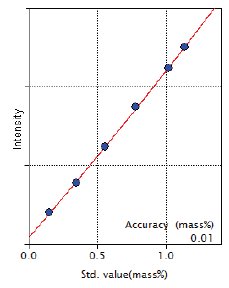
Figure 9: Calibration curve of Ni
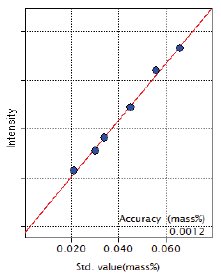
Figure 10: Calibration curve of Mg
As shown in the Figure 1, the good linear calibration curve of C for the concentration range from 2.35 to 3.69 mass% was obtained using the high reflectivity synthetic multilayer RX61 for C.
A trace amount of Mg is added to ductile cast iron. The RX25 is an optimum synthetic multilayer for the analysis of trace magnesium in cast iron and high sensitivity calibration was obtained as shown in Figure 10.
Results
The accuracy of the calibration curves is listed in Table 1 and the repeatability test results (10 times) are indicated in Table 2.
Table 1: Accuracy of calibration curves ( unit : mass% )
| Component | Concentration Range | Accuracy |
| C | 2.35 – 3.69 | 0.026 |
| Si | 0.98 – 3.08 | 0.016 |
| Mn | 0.22 – 1.17 | 0.0074 |
| P | 0.019 – 0.087 | 0.00040 |
| S | 0.014 – 0.123 | 0.0021 |
| Cu | 0.12 – 1.07 | 0.0082 |
| Cr | 0.13 – 1.01 | 0.016 |
| Mo | 0.10 – 0.95 | 0.0041 |
| Ni | 0.15 – 1.14 | 0.010 |
| Mg | 0.021 – 0.066 | 0.0012 |
The accuracy is calculated by the following formula:
$Accuracy = \sqrt{ \frac{\sum_i{(C_i-\hat{C}_i)^2}}{n-m} }$
$C_i$: calculated value of standard sample
$\hat{C}_i$: reference value of standard sample
n : number of standard samples.
m: degree of freedom (linear 2, quad. 3)
Table 2: Result of repeatability ( unit : mass% )
| Component | Average | Std dev. | RSD% | Sample |
| C | 3.23 | 0.0078 | 0.24 | 7-14 |
| Si | 2.24 | 0.0027 | 0.12 | 7-14 |
| Mn | 0.67 | 0.00074 | 0.11 | 7-14 |
| P | 0.049 | 0.00042 | 0.85 | 7-14 |
| S | 0.087 | 0.00053 | 0.61 | 7-14 |
| Cu | 0.52 | 0.00114 | 0.22 | 7-14 |
| Cr | 0.70 | 0.00087 | 0.13 | 7-14 |
| Mo | 0.47 | 0.00038 | 0.08 | 7-14 |
| Ni | 0.79 | 0.0015 | 0.19 | 7-14 |
| Mg | 0.030 | 0.00074 | 2.45 | 3-13b |
Conclusions
The results demonstrate that high precision and accurate analysis of the elements in cast iron can be performed using ZSX Primus III+ and that the spectrometer can be used for total analysis from z =6, carbon for cast iron analysis. It is also possible to analyze alloyed Ni-Resist cast iron and casting sands with good precision using the ZSX Primus III+, which is an optimized X-ray spectrometer for process control of ferrous foundry.

