Application Note EDXRF1422
Scope
The analysis of silicone coating on paper, clay-coated paper, and plastic is demonstrated.
Background
Paper and plastic are coated with a thin layer of silicone as a release coating in the manufacturing of labels, tape, or other adhesives or as a barrier coating for protection against air in the packaging of food, medical products, and other materials. In a clay-coated paper the clay coating adds weight and adjusts various physical properties, such as paper glossiness and ink retention. During the coating process, the amount of silicone coating, usually expressed as coat weight in g/m² or lbs/ream, must be periodically measured to ensure the proper physical properties of the product. When the coating is too heavy, silicone material is needlessly wasted—while too little coating may not meet the product spec. In order to achieve reliable QA/QC, Rigaku offers the NEX QC+ EDXRF analyzer. Simple to operate, the NEX QC+ gives the QC technician an ideal tool for quickly checking silicone coat weight to maintain the highest product quality with minimal costs.
Units
Coat weight is expressed as mass/area, in other words, amount of silicone per area of paper. Typical coat weight units are g/m², also called gsm. Lower silicone levels may be expressed as mg/m². In the US and other countries that use the Imperial system, the units lbs/ream (pounds per ream) are used. A typical conversion is given here, based on 1 ream = 3000 ft².
1.000 lbs/ream = 1.631 g/m²
1.000 g/m² = 0.613 lbs/ream
Calibration — paper
An empirical calibration was built using a set of assayed paper standards.
Paper (silicone 0.34 – 1.50 g/m²)
| Element: Si Units: g/m² |
||
| Sample I.D. | Standard value | Calculated value |
| 1 | 0.33 | 0.332 |
| 2 | 0.44 | 0.434 |
| 3 | 0.54 | 0.546 |
| 4 | 0.62 | 0.620 |
| 5 | 0.71 | 0.708 |
| 6 | 1.50 | 1.500 |
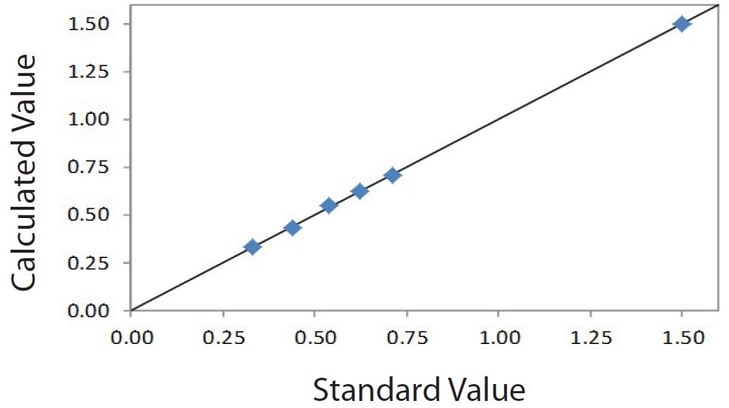 Correlation plot Si on paper
Repeatability — paper
To demonstrate repeatability (precision), the low and high coat weight samples were chosen from the set of calibration standards. Each sample was measured in a static position for ten repeat analyses with typical results shown below.
| Element: Si Units: g/m² |
||||
| Sample I.D. | Standard value | Average value | Std. dev | % Relative |
| 1 | 0.33 | 0.332 | 0.0017 | 0.6 |
| 6 | 1.50 | 1.506 | 0.0047 | 0.3 |
Calibration — clay-coated paper
Measuring silicone coating on clay-coated paper requires adjustment for variations in the clay coat. The clay coat may vary from roll to roll or along a roll, and various clays may have differing compositions. The Rigaku approach corrects for the amount and composition of the clay on each particular sample, and a single calibration is used to measure varying clay coat samples.
As a demonstration, an empirical calibration was built using a set of low clay coat and high clay coat standards in which the clay composition itself varies. Automatic corrections are employed to correct for the variations in clay coat and clay composition.
Clay-coated Paper (silicone 0.24 – 2.38 g/m²)
| Element: Si Units: g/m² |
||
| Sample I.D. | Standard value | Calculated value |
| H1 | 0.24 | 0.242 |
| H2 | 0.28 | 0.277 |
| H3 | 0.33 | 0.329 |
| H4 | 0.98 | 0.993 |
| H5 | 1.11 | 1.098 |
| H6 | 1.14 | 1.142 |
| L1 | 0.59 | 0.591 |
| L2 | 1.08 | 1.090 |
| L3 | 1.26 | 1.257 |
| L4 | 1.42 | 1.392 |
| L5 | 1.58 | 1.602 |
| L6 | 2.38 | 2.379 |
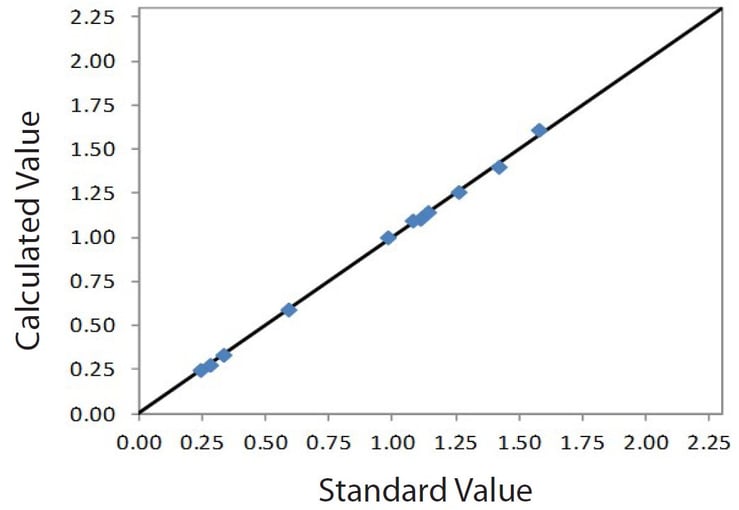 Correlation plot Si on clay-coated paper
Repeatability — clay-coated paper
To demonstrate repeatability (precision), the low and high silicone coat weight samples were chosen from the set of calibration standards. Each sample was measured in a static position for ten repeat analyses with typical results shown below.
| Element: Si Units: g/m² |
||||
| Sample I.D. | Standard value | Average value | Std. dev | % Relative |
| H1 | 0.24 | 0.248 | 0.014 | 5.8 |
| L1 | 0.59 | 0.601 | 0.007 | 1.2 |
| H6 | 1.14 | 1.132 | 0.005 | 0.4 |
| L6 | 2.38 | 2.369 | 0.009 | 0.4 |
Calibration — plastic
An empirical calibration was built using a set of assayed thin plastic standards.
Plastic (silicone 0.56 – 2.20 g/m²)
| Element: Si Units: g/m² |
||
| Sample I.D. | Standard value | Calculated value |
| 1 | 0.56 | 0.554 |
| 2 | 0.68 | 0.688 |
| 3 | 0.98 | 0.983 |
| 4 | 1.14 | 1.131 |
| 5 | 1.21 | 1.213 |
| 6 | 2.20 | 2.200 |
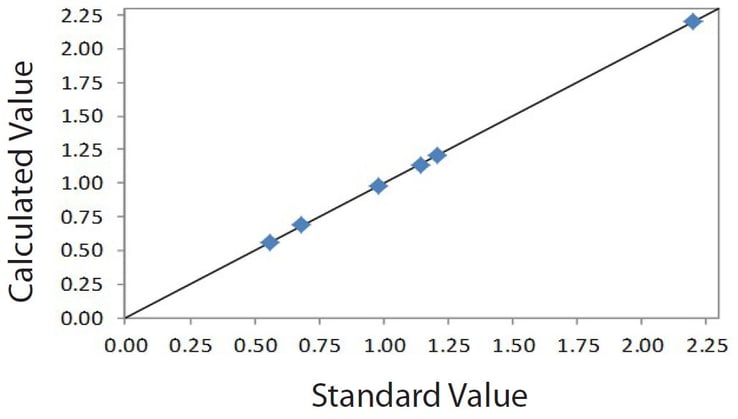 Correlation plot Si on plastic
Repeatability — plastic
To demonstrate repeatability (precision), the low and high coat weight samples were chosen from the set of calibration standards. Each sample was measured in a static position for ten repeat analyses with typical results shown below.
| Element: Si Units: g/m² |
||||
| Sample I.D. | Standard value | Average value | Std. dev | % Relative |
| 1 | 0.56 | 0.562 | 0.0016 | 0.3 |
| 6 | 2.20 | 2.196 | 0.0056 | 0.3 |
Conclusion
The typical results detailed here show exceptional performance for the fast and simple measurement of silicone coat weight on paper and plastic. Rigaku’s clay correction automatically adjusts silicone coat weight measurement based on the clay coat and clay composition of each particular sample being measured. The Rigaku NEX QC+ is an excellent tool in the quality control process of producing coated products, giving the production process an affordable means of optimizing quality while minimizing costs and helping to minimize product rejection and waste.

